如何为 ONLYOFFICE AI 插件添加自定义功能
ONLYOFFICE AI 插件现已采用全新的、对开发者更友好的架构。如果您想扩展插件功能,例如添加特定的 AI 功能,您不再需要编辑一个庞大且结构单一的文件。
取而代之的是,插件现在在 .dev 文件夹中提供了一个专用工作区。本指南将详细展示如何利用此工作区来添加新的自定义功能。
我们将以为文档编辑器构建描述图像功能作为示例。

开发工作流程
核心概念很简单:您在 .dev 环境中工作,脚本会生成生产代码。
- .dev/helpers/: 这是您的沙盒环境。您可以在这里创建新文件。
- helpers.js: 这是插件实际读取的生产文件。请勿直接编辑此文件。它是自动生成的。
步骤 1:选择编辑器范围
在 .dev/helpers/ 目录中,您会找到三个文件夹,分别对应 ONLYOFFICE 的编辑器:
- word/ (文本文档编辑器)
- cell/ (电子表格编辑器)
- slide/ (演示文稿编辑器)
由于我们的图像描述功能是针对文本文件的,因此我们将在 .dev/helpers/word/ 目录中工作。
步骤 2:创建自定义功能
在 .dev/helpers/word/ 目录中创建一个名为 describe-image.js 的新文件。
该插件使用名为 RegisteredFunction 的特定类来定义功能。此结构告诉 AI 该功能的功能以及如何调用它。
提示:确保语法正确(注意是否缺少右括号)。
代码:
(function () {
  let func = new RegisteredFunction({
    name: "describeImage",
    description:
      "Allows users to select an image and generate a meaningful title, description, caption, or alt text for it using AI.",
    // Define parameters so the AI knows what to ask for
    parameters: {
      type: "object",
      properties: {
        prompt: {
          type: "string",
          description:
            "instruction for the AI (e.g., 'Add a short title for this chart.')",
        },
      },
      required: ["prompt"],
    },
    // Provide examples to train the AI on usage
    examples: [
      {
        prompt: "Add a short title for this chart.",
        arguments: { prompt: "Add a short title for this chart." },
      },
      {
        prompt: "Write me a 1–2 sentence description of this photo.",
        arguments: {
          prompt: "Write me a 1–2 sentence description of this photo.",
        },
      },
      {
        prompt: "Generate a descriptive caption for this organizational chart.",
        arguments: {
          prompt:
            "Generate a descriptive caption for this organizational chart.",
        },
      },
      {
        prompt: "Provide accessibility-friendly alt text for this infographic.",
        arguments: {
          prompt:
            "Provide accessibility-friendly alt text for this infographic.",
        },
      },
    ],
  });

   // The actual logic executed inside the editor
  func.call = async function (params) {
    let prompt = params.prompt;

    async function insertMessage(message) {
      Asc.scope._message = String(message || "");
      // 3. Insert the result into the document
      await Asc.Editor.callCommand(function () {
        const msg = Asc.scope._message || "";
        const doc = Api.GetDocument();
        const selected =
          (doc.GetSelectedDrawings && doc.GetSelectedDrawings()) || [];
        if (selected.length > 0) {
          for (let i = 0; i < selected.length; i++) {
            const drawing = selected[i];
            const para = Api.CreateParagraph();
            para.AddText(msg);
            drawing.InsertParagraph(para, "after", true);
          }
        } else {
          const para = Api.CreateParagraph();
          para.AddText(msg);
          let range = doc.GetCurrentParagraph();
          range.InsertParagraph(para, "after", true);
        }
        Asc.scope._message = "";
      }, true);
    }

    try {
    // 1. Get the selected image
      let imageData = await new Promise((resolve) => {
        window.Asc.plugin.executeMethod(
          "GetImageDataFromSelection",
          [],
          function (result) {
            resolve(result);
          }
        );
      });

      if (!imageData || !imageData.src) {
        await insertMessage("Please select a valid image first.");
        return;
      }

      const whiteRectangleBase64 =
        "data:image/png;base64,iVBORw0KGgoAAAANSUhEUgAAAAEAAAABCAYAAAAfFcSJAAAADUlEQVR42mP8/5+hHgAHggJ/PchI7wAAAABJRU5ErkJggg==";
      if (imageData.src === whiteRectangleBase64) {
        await insertMessage("Please select a valid image first.");
        return;
      }

      let argPrompt = prompt + " (for the selected image)";
      // 2. Send image + prompt to the AI engine
      let requestEngine = AI.Request.create(AI.ActionType.Chat);
      if (!requestEngine) {
        await insertMessage("AI request engine not available.");
        return;
      }

      const allowVision = /(vision|gemini|gpt-4o|gpt-4v|gpt-4-vision)/i;
      if (!allowVision.test(requestEngine.modelUI.name)) {
        await insertMessage(
          "⚠ This model may not support images. Please choose a vision-capable model (e.g. GPT-4V, Gemini, etc.)."
        );
        return;
      }

      await Asc.Editor.callMethod("StartAction", [
        "Block",
        "AI (" + requestEngine.modelUI.name + ")",
      ]);
      await Asc.Editor.callMethod("StartAction", ["GroupActions"]);

      let messages = [
        {
          role: "user",
          content: [
            { type: "text", text: argPrompt },
            {
              type: "image_url",
              image_url: { url: imageData.src, detail: "high" },
            },
          ],
        },
      ];

      let resultText = "";
      await requestEngine.chatRequest(messages, false, async function (data) {
        if (data) {
          resultText += data;
        }
      });

      await Asc.Editor.callMethod("EndAction", ["GroupActions"]);
      await Asc.Editor.callMethod("EndAction", [
        "Block",
        "AI (" + requestEngine.modelUI.name + ")",
      ]);

      Asc.scope.text = resultText || "";

      if (!Asc.scope.text.trim()) {
        await insertMessage(
          "⚠ AI request failed (maybe the model cannot handle images)."
        );
        return;
      }
      await insertMessage(Asc.scope.text);
    } catch (e) {
      try {
        await Asc.Editor.callMethod("EndAction", ["GroupActions"]);
        await Asc.Editor.callMethod("EndAction", [
          "Block",
          "AI (describeImage)",
        ]);
      } catch (ee) {
        /* ignore */
      }
      console.error("describeImage error:", e);
      await insertMessage(
        "An unexpected error occurred while describing the image."
      );
    }
  };

  return func;
})();
步骤 3:升级插件版本
在编译和测试更改之前,建议先升级插件版本。这可以确保 ONLYOFFICE 将您的构建视为新插件,避免缓存问题,并有助于跟踪长期更改。
打开插件文件夹中的 config.json 文件。
将版本号增加一个补丁级别,例如:
"version": "3.0.0" to "3.1.0"建议桌面版和网页版编辑器都进行此操作:
桌面版:确保应用程序重新加载更新后的插件。
网页版(包括自定义商店链接):防止缓存忽略您在 helpers.js 文件中所做的更改。
步骤 4:编译更改
这是新工作流程中最重要的一步。插件目前还无法直接读取您的新文件。您必须运行辅助脚本,将新文件合并到主插件逻辑中。
1. 打开终端。
2. 导航到 helpers 目录:
cd .dev/helpers3. 运行 Python 构建脚本:
python3 helpers.py
helpers.py 脚本会扫描 word/、cell/ 和 slide/ 文件夹,找到你新编写的 describe-image.js 文件,并将其合并到主 helpers.js 文件中。
步骤 5:创建 .plugin 文件
- 选择所有插件内容。
- 压缩为 ZIP 文件。
- 将压缩包的 .zip 文件名重命名为 .plugin。
- 将其放置在插件目录下的名为 deploy 的文件夹中。
步骤 6:在 ONLYOFFICE 中替换插件
桌面编辑器
在最新版本的 ONLYOFFICE 桌面编辑器中,AI 插件已默认包含在内。如果您使用的是尚未捆绑该插件的旧版本,则安装过程取决于您的具体情况,并遵循以下两种路径:
A) 首次安装 AI 插件
如果您的本地插件目录中缺少 AI 插件:
- 打开 ONLYOFFICE 桌面编辑器。
- 转到插件→插件管理器→可用插件→手动安装插件。
- 当系统提示选择文件时,请选择您编译好的 .plugin 文件。
B) 更新本地已有的 AI 插件副本
如果插件已存在于您的系统中:
- 前往 ~/.local/share/onlyoffice/desktopeditors/sdkjs-plugins 目录
- 找到名称与 config.json 中的插件 GUID 匹配的文件夹 – {9DC93CDB-B576-4F0C-B55E-FCC9C48DD007}
- 将该文件夹替换为您新构建的插件。
- 重启桌面应用程序。
网页编辑器(通过自定义商店链接)
自定义商店链接
为您的 fork 启用 GitHub Pages。
确保将 config.json 中的版本号加一,以避免缓存问题。
- fork ONLYOFFICE 插件市场仓库。您将从以下网址获取副本:
https://github.com/YOUR-USERNAME/ONLYOFFICE/onlyoffice.github.io - 确保您的插件文件夹包含一个 deploy 文件夹,其中包含 .plugin 文件。
- 将您的插件文件夹添加到:
onlyoffice.github.io/sdkjs-plugins/content/ai/ - 从此仓库构建您的 GitHub Pages 站点(请参阅 GitHub Pages 文档)
- 通过在 GitHub Pages URL 后附加 /store/index.html 来准备指向您的自定义商店的链接:
https://YOUR-USERNAME.github.io/onlyoffice.github.io/store/index.html - 在 config.json 中增加插件版本(如步骤 3 所述)以绕过缓存。
更新插件
在更新到您的自定义版本之前,您可能需要移除预装版本,具体取决于您的设置。
- 检查 AI 插件是否已安装
打开网页编辑器并转到插件→插件管理器。
如果已安装 AI 插件,请将其移除:
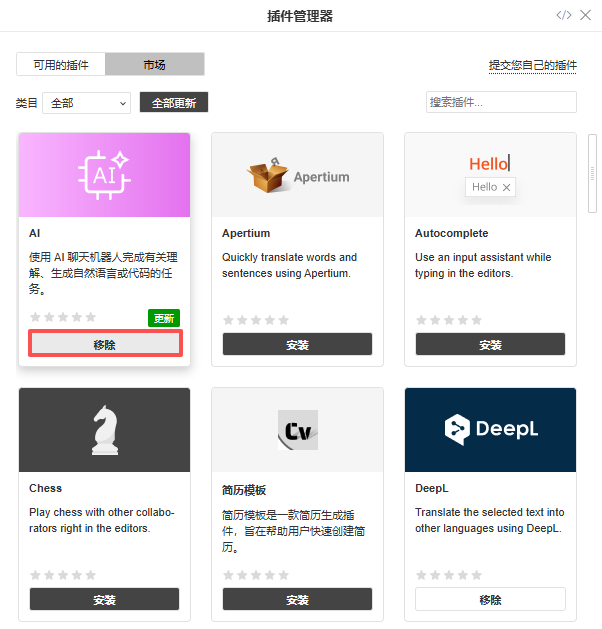
如果尚未安装,请继续执行下一步。
这样可以确保自定义版本能够顺利安装或更新,不会发生冲突。
- 添加您的自定义商店
点击插件管理器右上角的商店图标:

请输入您的自定义商店网址:
https://YOUR-USERNAME.github.io/onlyoffice.github.io/store/index.html

您的自定义商店现在将显示在插件管理器中。
- 安装 AI 插件
自定义商店加载完成后,在列表中找到 AI 助手,然后点击安装。

步骤 7:测试功能
- 在 ONLYOFFICE 中重新加载插件。
- 在文档中选择一张图片。
- 询问 AI:“描述这张图片”或“为这张图片写一个标题”。
AI 现在会识别你新编写的自定义功能,并执行你刚刚编写的逻辑。
创建免费的 ONLYOFFICE 账户
在线查看并协作编辑文本文档、电子表格、幻灯片、表单和 PDF 文件。