How to add a custom provider to the ONLYOFFICE AI plugin
With the release of the ONLYOFFICE AI plugin, we’ve significantly enhanced the default functionality of our editors. At ONLYOFFICE, we are committed to delivering powerful and flexible solutions that adapt to your specific needs. One of those is the option of adding any custom provider to our AI plugin. In this blog post, we will demonstrate how to integrate Tongyi Qianwen and Kimi services into the AI plugin, providing a step-by-step guide through the process.

About Tongyi Qianwen and Kimi
Alibaba Cloud Tongyi Qianwen and Kimi are advanced AI language models designed for natural language processing and text generation.
- Tongyi Qianwen, developed by Alibaba Cloud, is a powerful large language model that supports various AI-driven applications, including content creation, chatbots, and enterprise solutions.
- Kimi, created by Moonshot AI, is another large language model known for its efficiency in handling complex queries, generating human-like text, and assisting in various tasks.
Both models offer robust AI capabilities, making them suitable for integration into the ONLYOFFICE AI plugin to enhance document editing and automation.
Prerequisites
Before adding a custom provider, make sure you complete the following steps:
- Obtain the necessary credentials: Retrieve the base URL, model version, and API key from your chosen provider.
- Create a dedicated JavaScript file: Store the base URL, model version, and API key in a separate JavaScript file.
Before integrating a custom provider, let’s break down the key credentials you’ll need:
- Base URL: This is the web address where API requests are sent. In some cases, the base URL may include an endpoint that specifies the model being used:
https://dashscope.aliyuncs.com/compatible-mode/
- Model Version: This identifies the version of the model you are accessing. Sometimes, the model version is included in the base URL:
https://api.moonshot.cn/v1
In this example, the model version is v1.
- API Key: A unique key provided by the service provider, used for authentication.
Creating the external JavaScript file
To add a custom provider and display it in the list of available providers within the AI Plugin, you need to create and upload an external JS file.
Custom providers parsed from this file are instances of the Provider class, which extends AI.Provider. This class manages all available providers within the plugin.
Below are the parameters of the Provider class:
class Provider {
        /**
         * Provider base class.
         * @param {string} name  Provider name.
         * @param {string} url   Url to service.
         * @param {string} key   Key for service. This is an optional field. Some providers may require a key for access.
         * @param {string} addon Addon for url. For example: v1 for many providers.
         */
        constructor(name, url, key, addon) {
            this.name  = name  || "";
            this.url   = url   || "";
            this.key   = key   || "";
            this.addon = addon || "";

            this.models = [];
            this.modelsUI = [];
        }
Now let’s take a look at our implementation for the Tongyi Qianwen service:
"use strict";


class Provider extends AI.Provider {


    constructor() {
        super("Alibab Cloud", "https://dashscope.aliyuncs.com/compatible-mode", "yourAPIKey", "v1");
    }


}
Where:
- Alibaba Cloud: the name of the provider that will be displayed in the plugin.
- https://dashscope.aliyuncs.com/compatible-mode: the web address to which we are sending the API request.
- yourAPIKey: the API key issued by the provider.
- v1: the version of the model to which we are sending the API request.
Implementation for the Kimi service is the following:
"use strict";


class Provider extends AI.Provider {


    constructor() {
        super("Kimi", " https://api.moonshot.cn", "yourAPIkey", "v1");
    }


}
Adding the custom provider
- Right-click on any selected word and navigate to AI > Settings.

- In the AI Configuration window, select Edit AI models.
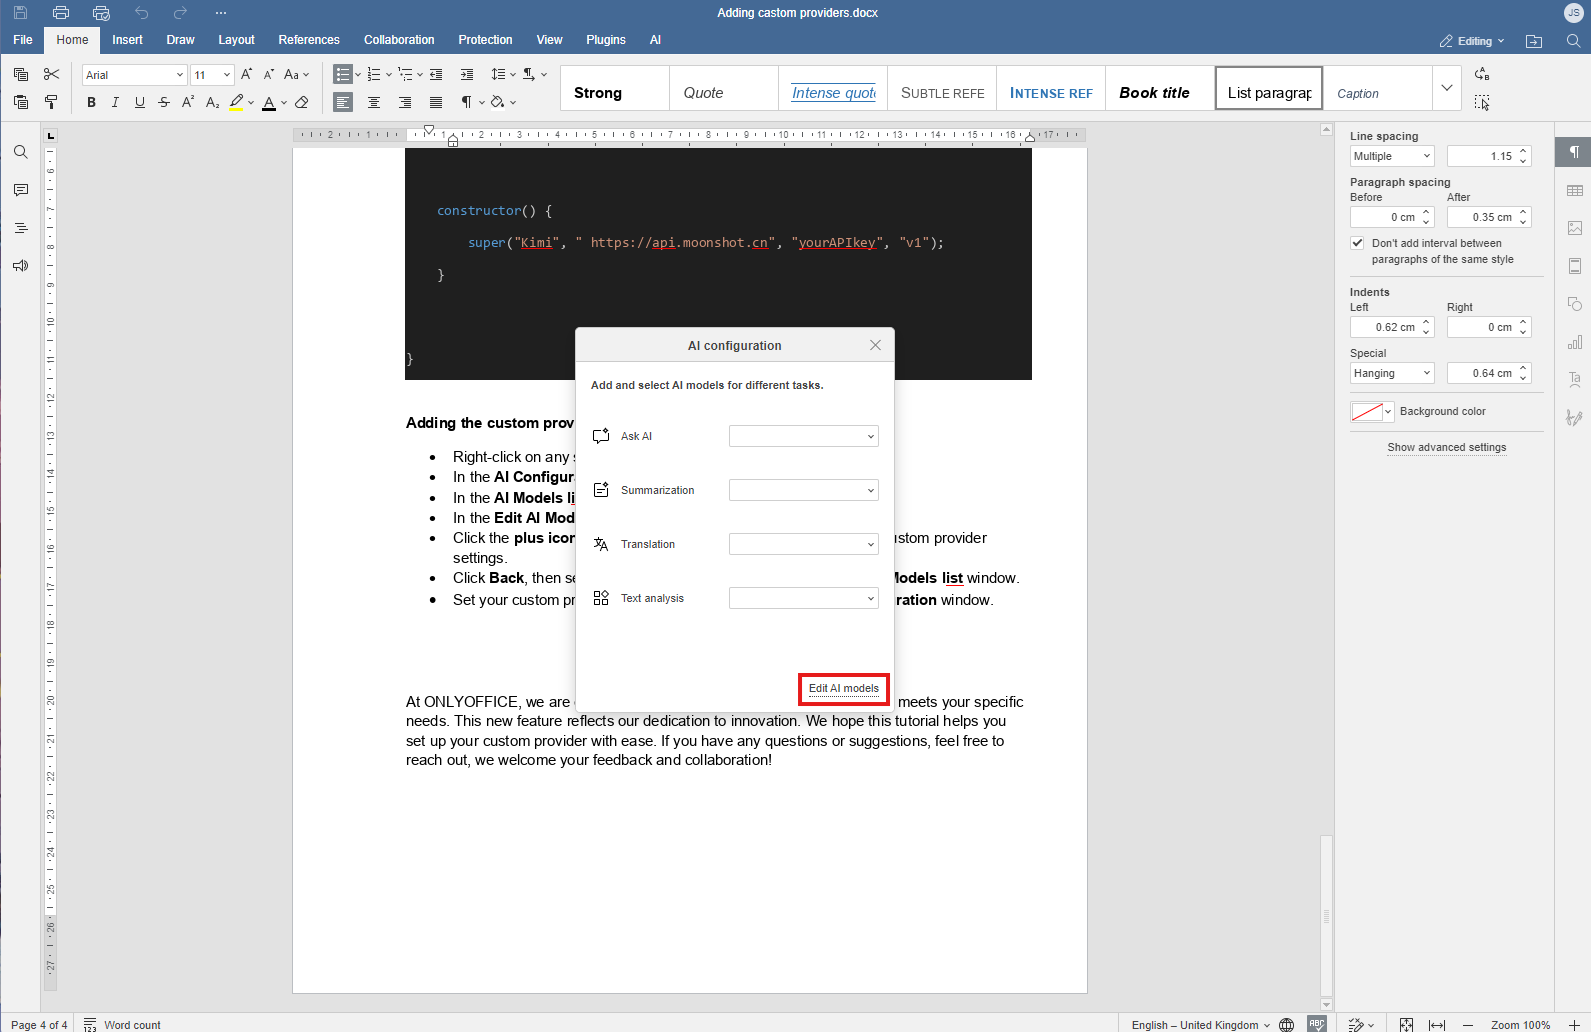
- In the AI Models list window, click the pencil icon to edit models.

- In the Edit AI Model window, click custom providers.

- Click the plus icon and upload the JavaScript file containing your custom provider settings.

- Click Back to exit Add AI Model window.

- Select your custom provider from the list in the Add AI Model window and click OK.
Tongyi Qianwen:

Kimi:

- Click Back to exit the AI Models list window.

- Set your custom provider model for a specific task in the AI Configuration window.

After completing these steps, the AI plugin is fully configured and ready to assist with a wide variety of tasks!
At ONLYOFFICE, we are committed to delivering versatile functionality that meets your specific needs. This new feature reflects our dedication to innovation. We hope this tutorial helps you set up your custom provider with ease. If you have any questions or suggestions, feel free to reach out, we welcome your feedback and collaboration!
Create your free ONLYOFFICE account
View, edit and collaborate on docs, sheets, slides, forms, and PDF files online.